How to Set Up Virtual Clusters
What is Hived Scheduler and How to Configure it
OpenPAI supports two kinds of schedulers: the Kubernetes scheduler, and hivedscheduler. Hivedscheduler is a Kubernetes Scheduler for Deep Learning. It supports virtual cluster division, topology-aware resource guarantee, and optimized gang scheduling, which are not supported in the k8s default scheduler. If you didn't specify enable_hived_scheduler: false during installation, hived scheduler is enabled by default. Please notice the only hived scheduler supports virtual cluster setup, k8s default scheduler doesn't support it.
Set Up Virtual Clusters
Configuration for GPU Virtual Cluster
Before we start, please read this doc to learn how to write hived scheduler configuration.
In services-configuration.yaml, there is a section for hived scheduler, for example:
# services-configuration.yaml
...
hivedscheduler:
  config: |
    physicalCluster:
      skuTypes:
        DT:
          gpu: 1
          cpu: 5
          memory: 56334Mi
      cellTypes:
        DT-NODE:
          childCellType: DT
          childCellNumber: 4
          isNodeLevel: true
        DT-NODE-POOL:
          childCellType: DT-NODE
          childCellNumber: 3
      physicalCells:
      - cellType: DT-NODE-POOL
        cellChildren:
        - cellAddress: worker1
        - cellAddress: worker2
        - cellAddress: worker3
    virtualClusters:
      default:
        virtualCells:
        - cellType: DT-NODE-POOL.DT-NODE
          cellNumber: 3
...
If you have followed the installation guide, you would find similar setting in your services-configuration.yaml. The detailed explanation of these fields are in the hived scheduler document. You can update the configuration and set up virtual clusters. For example, in the above settings, we have 3 nodes, worker1, worker2, and worker3. They are all in the default virtual cluster. If we want to create two VCs, one is called default and has 2 nodes, the other is called new and has 1 node, we can first modify services-configuration.yaml:
# services-configuration.yaml
...
hivedscheduler:
  config: |
    physicalCluster:
      skuTypes:
        DT:
          gpu: 1
          cpu: 5
          memory: 56334Mi
      cellTypes:
        DT-NODE:
          childCellType: DT
          childCellNumber: 4
          isNodeLevel: true
        DT-NODE-POOL:
          childCellType: DT-NODE
          childCellNumber: 3
      physicalCells:
      - cellType: DT-NODE-POOL
        cellChildren:
        - cellAddress: worker1
        - cellAddress: worker2
        - cellAddress: worker3
    virtualClusters:
      default:
        virtualCells:
        - cellType: DT-NODE-POOL.DT-NODE
          cellNumber: 2
      new:
        virtualCells:
        - cellType: DT-NODE-POOL.DT-NODE
          cellNumber: 1
...
Configuration for CPU-only Virtual Cluster
Currently we recommend you to set up a pure-CPU virtual cluster, and don't mix CPU nodes with GPU nodes in one virtual cluster. Please omit gpu field or use gpu: 0 in skuTypes for the VC. Here is an example:
hivedscheduler:
  config: |
    physicalCluster:
      skuTypes:
        DT:
          gpu: 1
          cpu: 5
          memory: 56334Mi
        CPU:
          cpu: 1
          memory: 10240Mi
      cellTypes:
        DT-NODE:
          childCellType: DT
          childCellNumber: 4
          isNodeLevel: true
        DT-NODE-POOL:
          childCellType: DT-NODE
          childCellNumber: 3
        CPU-NODE:
          childCellType: CPU
          childCellNumber: 8
          isNodeLevel: true
        CPU-NODE-POOL:
          childCellType: CPU-NODE
          childCellNumber: 1
      physicalCells:
      - cellType: DT-NODE-POOL
        cellChildren:
        - cellAddress: worker1
        - cellAddress: worker2
        - cellAddress: worker3
      - cellType: CPU-NODE-POOL
        cellChildren:
        - cellAddress: cpu-worker1
    virtualClusters:
      default:
        virtualCells:
        - cellType: DT-NODE-POOL.DT-NODE
          cellNumber: 3
      cpu:
        virtualCells:
        - cellType: CPU-NODE-POOL.CPU-NODE
          cellNumber: 1
Explanation of the above example: Supposing we have a node named cpu-worker1 in Kubernetes. It has 80GB memory and 8 allocatable CPUs (please use kubectl describe node cpu-worker1 to confirm the allocatable resources). Then, in skuTypes, we can set a CPU sku, which has 1 CPU and 10240 MiB (80GiB / 8) memory. You can reserve some memory or CPUs if you want. CPU-NODE and CPU-NODE-POOL are set correspondingly in the cellTypes. Finally, the setting will result in one default VC and one cpu VC. The cpu VC contains one CPU node.
Apply Configuration in Cluster
After modification of the configuration, use the following commands to apply the settings:
./paictl.py service stop -n rest-server hivedscheduler
./paictl.py config push -p <config-folder> -m service
./paictl.py service start -n hivedscheduler rest-server
You can now test these new VCs, with any admin accounts in OpenPAI. Next section will introduce how to grant VC access to non-admin users.
How to Grant VC to Users
Admin users have access to all VCs. Thus, if you set up a new VC, you can use an admin account to test it. For non-admin users, administrators should grant VC access to them manually. The specific way depends on authentication mode of your cluster.
In Basic Authentication Mode
In basic authentication mode, administrators can grant VC access to users on the User Management page. First, click Edit on the page. Then you can configure VC access permission for each user as follows.
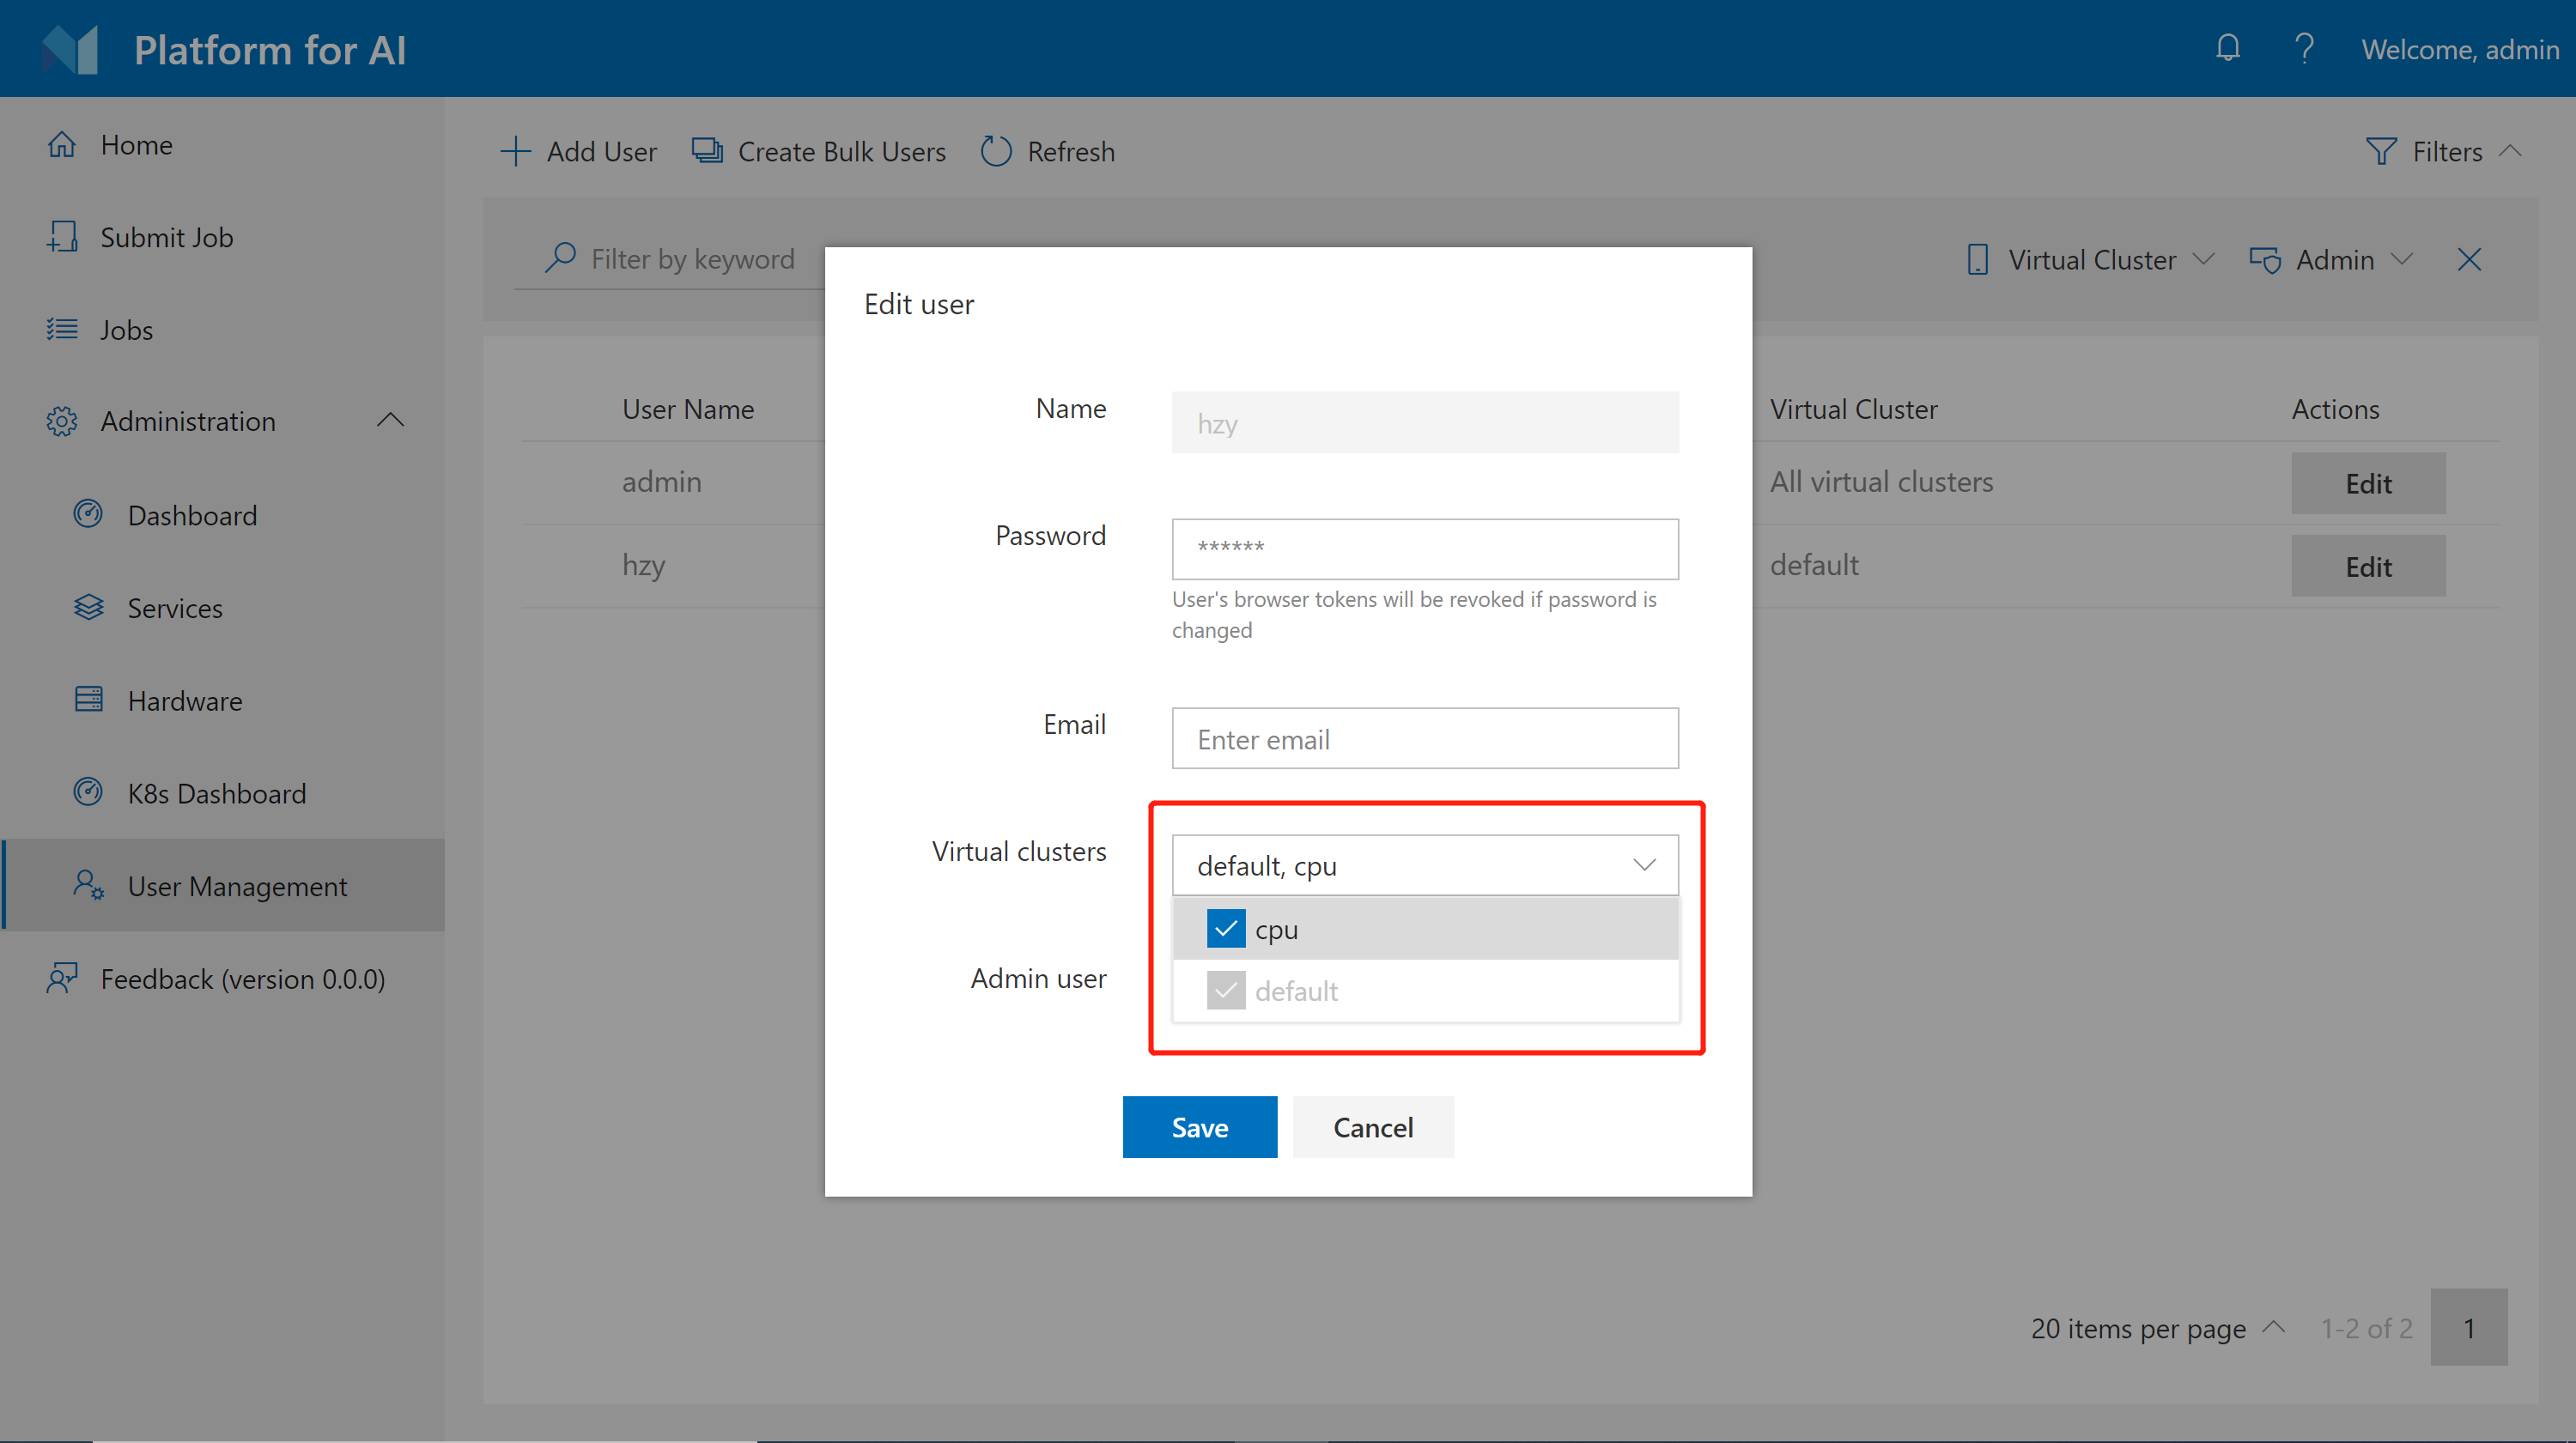
Please note you cannot revoke default VC from users.
In AAD Mode
Users are grouped by the AAD service in AAD mode. You should assign VC access to each group.
First, find the following section in your services-configuration.yaml:
# services-configuration.yaml
...
group-manager:
  ...
  grouplist:
    - groupname: group1
      externalName: sg1
      extension:
        acls:
          admin: false
          virtualClusters: ["vc1"]
          storageConfigs: ["azure-file-storage"]
    - groupname: group2
      externalName: sg2
      extension:
        acls:
          admin: false
          virtualClusters: ["vc1", "vc2"]
          storageConfigs: ["nfs-storage"]
...
This should be self-explanatory. The virtualClusters field is used to manage VC access for different groups. Use the following commands to apply your configuration change:
./paictl.py service stop -n rest-server
./paictl.py config push -p <config-folder> -m service
./paictl.py service start -n rest-server
Different Hardware in Worker Nodes
We recommend one VC should have the same hardware, which leads to one skuType of one VC in the hived scheduler setting. If you have different types of worker nodes (e.g. different GPU types on different nodes), please configure them in different VCs. Here is an example of 2 kinds of nodes:
hivedscheduler:
  config: |
    physicalCluster:
      skuTypes:
        K80:
          gpu: 1
          cpu: 5
          memory: 56334Mi
        V100:
          gpu: 1
          cpu: 8
          memory: 80000Mi
      cellTypes:
        K80-NODE:
          childCellType: K80
          childCellNumber: 4
          isNodeLevel: true
        K80-NODE-POOL:
          childCellType: K80-NODE
          childCellNumber: 2
        V100-NODE:
          childCellType: V100
          childCellNumber: 4
          isNodeLevel: true
        V100-NODE-POOL:
          childCellType: V100-NODE
          childCellNumber: 3
      physicalCells:
      - cellType: K80-NODE-POOL
        cellChildren:
        - cellAddress: k80-worker1
        - cellAddress: k80-worker2
      - cellType: V100-NODE-POOL
        cellChildren:
        - cellAddress: v100-worker1
        - cellAddress: v100-worker2
        - cellAddress: v100-worker3
    virtualClusters:
      default:
        virtualCells:
        - cellType: K80-NODE-POOL.K80-NODE
          cellNumber: 2
      V100:
        virtualCells:
        - cellType: V100-NODE-POOL.V100-NODE
          cellNumber: 3
In the above example, we set up 2 VCs: default and v100. The default VC has 2 K80 nodes, and V100 VC has 3 V100 nodes. Every K80 node has 4 K80 GPUs and every V100 node has 4 V100 GPUs.
Configure CPU and GPU SKU on the Same Node
If you want to configure both CPU and GPU sku types on the same node, you could use the same cellAddress for different cellTypes, here is an example.
hivedscheduler:
  config: |
    physicalCluster:
      skuTypes:
        GPU:
          gpu: 1
          cpu: 4
          memory: 40960Mi
        CPU:
          gpu: 0
          cpu: 1
          memory: 10240Mi
      cellTypes:
        GPU-NODE:
          childCellType: GPU
          childCellNumber: 4
          isNodeLevel: true
        GPU-NODE-POOL:
          childCellType: GPU-NODE
          childCellNumber: 2
        CPU-NODE:
          childCellType: CPU
          childCellNumber: 12
          isNodeLevel: true
        CPU-NODE-POOL:
          childCellType: CPU-NODE
          childCellNumber: 2
      physicalCells:
      - cellType: GPU-NODE-POOL
        cellChildren:
        - cellAddress: node1
        - cellAddress: node2
      - cellType: CPU-NODE-POOL
        cellChildren:
        - cellAddress: node1
        - cellAddress: node2
    virtualClusters:
      default:
        virtualCells:
        - cellType: GPU-NODE-POOL.GPU-NODE
          cellNumber: 2
      cpu:
        virtualCells:
        - cellType: CPU-NODE-POOL.CPU-NODE
          cellNumber: 2
Currently, we only support mixing CPU and GPU types on one NVIDIA GPU node or one AMD GPU node, rare cases including NVIDIA cards and AMD cards on one node are not supported.
Use Pinned Cell to Reserve Certain Node in a Virtual Cluster
In some cases, you might want to reserve a certain node in a virtual cluster, and submit jobs to this node explicitly for debugging or quick testing. OpenPAI provides you with a way to "pin" a node to a virtual cluster.
For example, assuming you have three worker nodes: worker1, worker2, and worker3, and 2 virtual clusters: default and new. The default VC has 2 workers, and the new VC only has one worker. The following is an example of the configuration:
# services-configuration.yaml
...
hivedscheduler:
  config: |
    physicalCluster:
      skuTypes:
        DT:
          gpu: 1
          cpu: 5
          memory: 56334Mi
      cellTypes:
        DT-NODE:
          childCellType: DT
          childCellNumber: 4
          isNodeLevel: true
        DT-NODE-POOL:
          childCellType: DT-NODE
          childCellNumber: 3
      physicalCells:
      - cellType: DT-NODE-POOL
        cellChildren:
        - cellAddress: worker1
        - cellAddress: worker2
        - cellAddress: worker3
    virtualClusters:
      default:
        virtualCells:
        - cellType: DT-NODE-POOL.DT-NODE
          cellNumber: 2
      new:
        virtualCells:
        - cellType: DT-NODE-POOL.DT-NODE
          cellNumber: 1
...
Now, if you want to "pin" the node worker2 to the default VC. You can edit the configuration to be:
# services-configuration.yaml
...
hivedscheduler:
  config: |
    physicalCluster:
      skuTypes:
        DT:
          gpu: 1
          cpu: 5
          memory: 56334Mi
      cellTypes:
        DT-NODE:
          childCellType: DT
          childCellNumber: 4
          isNodeLevel: true
        DT-NODE-POOL:
          childCellType: DT-NODE
          childCellNumber: 3
      physicalCells:
      - cellType: DT-NODE-POOL
        cellChildren:
        - cellAddress: worker1
        - cellAddress: worker2
          pinnedCellId: node-worker2
        - cellAddress: worker3
    virtualClusters:
      default:
        virtualCells:
        - cellType: DT-NODE-POOL.DT-NODE
          cellNumber: 1
        pinnedCells:
        - pinnedCellId: node-worker2
      new:
        virtualCells:
        - cellType: DT-NODE-POOL.DT-NODE
          cellNumber: 1
...
As you can see in the configuration, one virtual cluster can contain both virtual cells and pinned cells. Now the default VC has one virtual cell and one pinned cell. To include a pinned cell into the virtual cluster, you should give it a pinnedCellId.
The configuration will reserve worker2 in the default VC. You can also submit jobs to worker2 explicitly by specifying corresponding pinned cell id in extras.hivedScheduler.taskRoles.<task-role-name>.pinnedCellId, here is an example:
protocolVersion: 2
name: job-with-pinned-cell
type: job
jobRetryCount: 0
prerequisites:
  - type: dockerimage
    uri: 'openpai/standard:python_3.6-pytorch_1.2.0-gpu'
    name: docker_image_0
taskRoles:
  myworker:
    instances: 1
    completion:
      minFailedInstances: 1
    taskRetryCount: 0
    dockerImage: docker_image_0
    resourcePerInstance:
      gpu: 1
      cpu: 4
      memoryMB: 8192
    commands:
      - sleep 100s
defaults:
  virtualCluster: default
extras:
  com.microsoft.pai.runtimeplugin:
    - plugin: ssh
      parameters:
        jobssh: true
  hivedScheduler:
    taskRoles:
      myworker:
        pinnedCellId: node-worker2